• Home
  • About Tsoniki Crazy Bull
  • Blog Posts
  • Podcasts
  • Crafty Quickies
  • Craft Gift Ideas

Native Woman Sews, Crafts, Writes, and More

Home ยป Holiday Crafting

Chocolate Peanut Butter Thumbprint Cookies

December 31, 2014 by Tsoniki Leave a Comment

The original recipe came from the Food Network, but I changed the ingredients. I also converted to other measurements for some of the ingredients and the temp to Celsius.

ChocolatePeanutButterThumbprintCookies

I changed the recipe because I couldn’t find almond butter at the grocery store. I substituted peanut butter and still used actual almonds.

Ingredients

Cookies

1 1/2 cups flour
1 tsp baking powder
1/2 tsp salt
115 grams butter, room temperature OR 1 stick
1/2 cup smooth peanut butter
1/2 cup packed brown sugar
1/3 cup plus 3 tbsp white sugar
2 small OR 1 large egg
2 tsp vanilla
1/3 cup chopped almonds

Ganache
5 ounces of chocolate – I used Tablette d’Or Chocolate Noir Patissier – but I think any dark chocolate will work
recipe calls for heavy cream, I used creme fluide – finding a substitute for what I use in the US is only a minor inconvenience, the store usually has something I can use
Microwave and stir frequently so it does not burn

Preheat oven to 190C/375F

I made the ganache while the cookie batter was being prepared so it would be cooled off when the cookies were ready. It was the perfect amount of time.

Mix flour, baking powder, and salt; set aside. Combine the butter and peanut butter, add brown and white sugar, add egg (or eggs) and vanilla to the mixture. Slowly add the dry ingredients until the cookie dough is mixed completely.

Use two small bowls for the 3 tbsp of white sugar and the chopped almonds. Use a scoop to get a small amount of cookie dough out and roll into a ball. Roll the ball in the sugar first, and the almonds second. The almonds will not entirely coat the cookie, but many will stick.

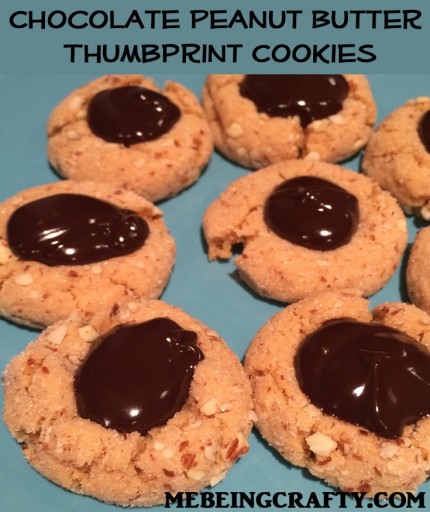
Cook for 12-13 minutes and take out of oven. Once the cookies are a little cooled, press your thumb in the center to form an indentation. Select a large star tip and fill a pastry bag with half of the ganache. The ganache needs to be cool enough to put onto the cookies, if it is too warm it will spread further. You do not have to use a star tip, using a round is also fine.

You also may be interested in: my Pinterest Challenge – Chicken Taquitos and Sugar Skulls and Chocolate Pumpkins

P.S. These are similar to the peanut butter cookies with a Hershey kiss on the top of them, but if you use a better chocolate and make a ganache, these cookies will turn out to be amazing!

Filed Under: Holiday Crafting

Make 90 Ornaments with Perler Beads

December 21, 2014 by Tsoniki 1 Comment

Sometimes when I see a new to me craft or quilt idea, I just go try it versus reading and rereading the instructions. This was one of those times. I read that someone melted Perler beads into metal Christmas ornaments and I thought, “I can do that!” Here’s what happened.

After buying two packages of beads at the local toy store, my family decided we should separate them into color groups.

perlerbeads

We picked out the cookie cutters we were interested in using. This is my collection of the last 14+ years – including packages of the Wilton like the link sends you to, singles I bought at Christmas markets, and others I ordered specially. Making cookies during the holidays is a really fun family tradition and I try to go all out.

cookiecutters

And we got to filling them in! I have a lot of different shaped cookie cutters – cowboy boot, horse, lightbulb, various gingerbread men and women, a tipi, a buffalo.

inornaments

Since I didn’t read the instructions anywhere, we tried standing the beads up, laying them all down, and pouring them in. Cool tipi cookie cutter.

laydownornaments

Once they were baked in the oven (we did make the mistake and cook some higher than the rest. I recommend 175F and after a few minutes check to see how long is a good amount of time. It doesn’t take long, five to seven minutes.) I put them in the freezer to quickly cool. This didn’t change how they looked, it just let us use the cookie cutters again a few minutes faster.

And after what felt like forever, we finally finished.

bakedornaments

And we ended up with 90 ornaments.

ornaments

There were a few ways the beads came out. If they were standing up and the oven wasn’t too hot, they melted uniformly. That’s how most of them look.

ornamentstwo

But we had the oven too hot a couple of times, and this caused the beads to both melt down and bubble. See the black and grey flower with the white outline above, with the pink center? The pink center bubbled so it’s kind of a blob. I pushed it back down so it’s flat, but it did mess up the pattern.

ornamentsthree

This is what they look like if you pour the beads into a cookie cutter and fill it up about halfway or so. The beads are not standing up in this case, so they are not melted together, but merely just melted. Not even melted, but just squished out and turned into little o’s. I really like this look actually, the horse and snowman below are so cool looking!

stackedornament

And here’s what they look like if they are laying on the side versus standing up. Standing them up did give them the chance to melt nicely. Depending on the shape and how many beads were put into the cutter, the shape looked good like the horse above or looked just a little bit off like the tree below. The tree still looks good! But it could have looked better, these two are the same shape.

treeornament

We have 90 ornaments and maybe a dozen Perler beads left. Not counting the few we found after we swept the floor.

buffalonation

And of course a shout out to the Buffalo nation!

Have you ever made anything with Perler beads? This is super easy, but time consuming depending on how detailed you get. And it does take time to make the beads stand up, we used chopsticks because of course our fingers are too big to fit into the cookie cutter.

Filed Under: Holiday Crafting, Kids Crafts, Tutorial

W.I.P. Wednesday Two

November 2, 2011 by Tsoniki 5 Comments

WIP Wednesday at Freshly Pieced

A whole week already! What a sad state my sewing room looks like. Not much has changed actually. I left last Thursday for a conference and didn’t get home until late Sunday night, which really was early Monday morning because it was 1AM. Monday was spent cleaning up and getting ready for Halloween, and vegging – because I was just so tired from the amazing three days I had in Portland, OR, attending the first NIKE N7 Sport Summit. It was a fantastic experience and I am so excited to share what I learned! I’ll do a post here soon, I need to edit my pictures!

And so all that I managed to finish were my kids Halloween costumes.

But I can’t take credit for the hats! I bought them on etsy. I LOVE the blue one, it fits JW perfectly. I have to admit a slight disappointment with the black bird and green pig hats though. They are WAY bigger then my kids heads, bigger then I think they should be anyway, and the yarn that the green one is made of stretches very easily, so it’s totally stretched out already. Despite my slight disappointment, the kids loved them and wore them from the day they arrived and still do. I’m going to throw the pig in the wash and see if the agitation makes the yarn shrink.

Sure the sewing was super easy for the costumes, but I’m glad I got to work on a little something! I’m back now and am going to continue on my postage stamp project this weekend.

Filed Under: Holiday Crafting, Sewing/Quilting, Works In Progress Tagged With: angry bird costumes, halloween, wip wednesday

Baby Food Jar Advent Calendar

December 10, 2010 by Tsoniki 4 Comments

I used empty baby food jars to make this fun and easy baby food jar advent calendar. I had all of these from my youngest and feeding him, but you could always get some from a friend with a baby. You can also use canning jars! These are sold in packs of 12 so two packages are perfect for your calendar.

baby-jar-advent-calendar
I love Advent Calendars. Check out my Advent Calendars board over on Pinterest!
To make a baby food jar advent calendar you need the following:

24 baby food jars or small canning jars
Holiday scrapbook paper
Large Marvy Paper Punch
Numbers stamps
Ink
Glue and tape

I was happy to discover that the light blue marvy punch is the same size as the lid of a baby food jar! Punch 24 different colored circles out of the scrapbook paper, then stamp the numbers 1-24 on them. You don’t need to use very much glue on the lids, if you do the paper may get wavy and the glue could soak through. Next, measure around the jars and cut a strip of paper a half an inch longer to wrap around the jar. This adds to the secret of what is hidden inside.

Once the jars are decorated, fill them up! I filled the jars with something different each day – jelly beans, gummy bears, chocolate kisses and in a couple of them I put some change. The jars are larger then a lot of other calendars, so they will take up space. Be sure to find a place away from tiny baby hands that will want to get inside!

Here is the Marvy paper punch we use:

March Circle Punch

And the canning jars, two packages are just right:

Small canning jars

And how about a holiday crafting book! This is free for kindle unlimited users!

holidaycraftingbook

Filed Under: Holiday Crafting Tagged With: advent calendar, christmas

Instagram

Read More Here

  • Craft Books
  • Craft Challenges
  • Craft Gift Ideas
  • Crafty Business
  • Crafty Quickie
  • Crafty Websites
  • Crochet Projects
  • Etsy Finds
  • Family
  • Finished Projects
  • Found This Week
  • France
  • Fun Links
  • Ghana
  • Holiday Crafting
  • Homeschool
  • Inspiration
  • Italy
  • Kids Crafts
  • Military
  • PinCushion Challenge
  • Podcast
  • Ramblings
  • Sewing/Quilting
  • Tutorial
  • Works In Progress

Recent Posts

  • An Update On Us in Accra, Ghana, during a Pandemic
  • What Are You Reading? Seven Books for your List
  • Shelter in Place in Ghana

Me Being Crafty 2006 - 2021 A Craft Blog Curated By Tsoniki Crazy Bull